In this tutorial, we’ll add the possibility of sending an email to the site’s admin to notify him that one person sends a message through the contact form. In other words, we want to send an email to the site’s admin after storing the user message in our database. We’ll then give the option to enable/disable the email notification feature via the admin panel.
This blog post is a part of a series that introduces you to the Laravel world by building a simple contact form protected by Google ReCaptcha and an admin panel to manage messages sent through our contact form. We also go deeper by adding an SMTP functionality.
- Part 1: Your Amazing Initiation to Laravel Framework
- Part 2: How to build a contact form with Laravel Framework
- Part 3: A simple admin panel for a Laravel contact form
- Part 4: How to build an authentication system with Laravel
- Part 5: How To Easily Delete Multiple Records In Laravel Using Checkbox
- Part 6: How To Add A Beautiful Delete Confirmation Message In Laravel
- Part 7: How to protect your Laravel forms with Google reCAPTCHA V3
- Part 8: How To Send Email using Laravel (This tutorial)
You can download the starting code for this tutorial here.
Step 1: Create a Mailable class
In Laravel Framework, to be able to send emails, we need to create a mailable class. This is made easy by Laravel with the Artisan command:
php artisan make:mail ContactMailThis command will create the class ContactMail in app\Mail\ContactMail.php to give us the possibility to send emails. The default content of this class is the following:
Everything is made here in the build method. We notice that this method returns an HTML view of the Email message. We’ll change that view by:
return $this->view('emails.contact');Let’s create that view in resources/views/emails/contact.blade.php with the following code:
To have access to contact information in this template, we need to pass those pieces of information to the mailable class. The final look of that class is the following:
Here, we have imported the Contact model (line 9), create a public property name $contact (line 16) as the variable we use in the blade template, and finally send an email in the build method.
Step 2: Send the email
We can send emails to one user or multiple users at the same time.
1. Send an email to one user
Open the ContactController class locate in app/Http/Controllers/ContactControllers.php. Import the Mail facade with the code:
use Illuminate\Support\Facades\Mail;Then, add the following line of code in the store method before the return instruction.
Mail::to(env("ADMIN_EMAIL"))->send(new ContactMail($contact));This line will allow us to send an email to the site’s admin with the email we have stored in the .env file. That email is sent with the ContactMail class responsible the send contact mail with the Contact object we have constructed. The complete code for the store method is the following:
Open your .env file and configure the following section:
MAIL_MAILER=smtp
MAIL_HOST=
MAIL_PORT=
MAIL_USERNAME=
MAIL_PASSWORD=
MAIL_ENCRYPTION=STARTTLS
MAIL_FROM_ADDRESS="hello@example.com"
MAIL_FROM_NAME="${APP_NAME}"
ADMIN_EMAIL=""
Add your SMTP configuration in this section. You can use Sendinblue, AWS SES, MailChimp, and Gmail. Also, add the email address where you want to receive the emails in the variable ADMIN_EMAIL.
After well configuring your SMTP, send a message through your contact form and you’ll receive one email message like this:

Voila, you can send emails in your Laravel application.
2. Send the email to multiple users
In some cases, you want to send the same email to multiple users at the same time. To do that, just replace the following line:
Mail::to(env("ADMIN_EMAIL"))->send(new ContactMail($contact));by
Mail::to(env("ADMIN_EMAIL"))
   ->cc(env("SECOND_ADMIN"))
    ->bcc(env("THIRD_ADMIN"))
    ->send(new ContactMail($contact));
Remember to add SECOND_ADMIN and THIRD_ADMIN in the .env. You can add multiple cc and bcc as many as you want.
Note: You can create a table in your database to store the emails you want to send emails to. We’ve preferred to save those emails to the .env file.
Now, you’ve seen how to send emails in a Laravel application. There is some optional step you can perform just to add additional feature to our contact form.
Step 3: Enable/Disable Email notification (Optional)
In some situations, we may want to tell your application not to send email notifications and to activate that feature when you want. To achieve that, we’ll create model Parameters and corresponding migration to save that information in our database.
1. Creation of Parameters model and migration
Use the following command to create the model Parameters and corresponding migration:
php artisan make:model Parameters -m -cOpen the created migration file and add the following code:
Schema::create('parameters', function (Blueprint $table) {
            $table->id();
            $table->boolean("is_email_notification_actived")->default(true);
            $table->timestamps();
        });
Open the file database/seeders/DatabaseSeeder.php and add the following code to create the default setting.
 public function run()
 {
        $parameters = new Parameters();
        $parameters->is_email_notification_actived = 1;
        $parameters->save();
 }
Run the following command to apply the migrations and seeders.
php artisan migrate:fresh --seed2. Modification of the ParametersControllers
Open the file app/Http/Controllers/ParametersController.php and paste the following code:
The method index is responsible to display the parameters page and save_parameter to save the parameters.
3. Modification of routes/web.php
Open the web.php file and add the following route inside the auth group:
Route::get("/admin/settings", [ParametersController::class, 'index']);
Route::post("/admin/settings", [ParametersController::class, 'save_parameter']);
Don’t forget to import the ParametersController with the code:
use App\Http\Controllers\ParametersController;4. Creation of the parameters template
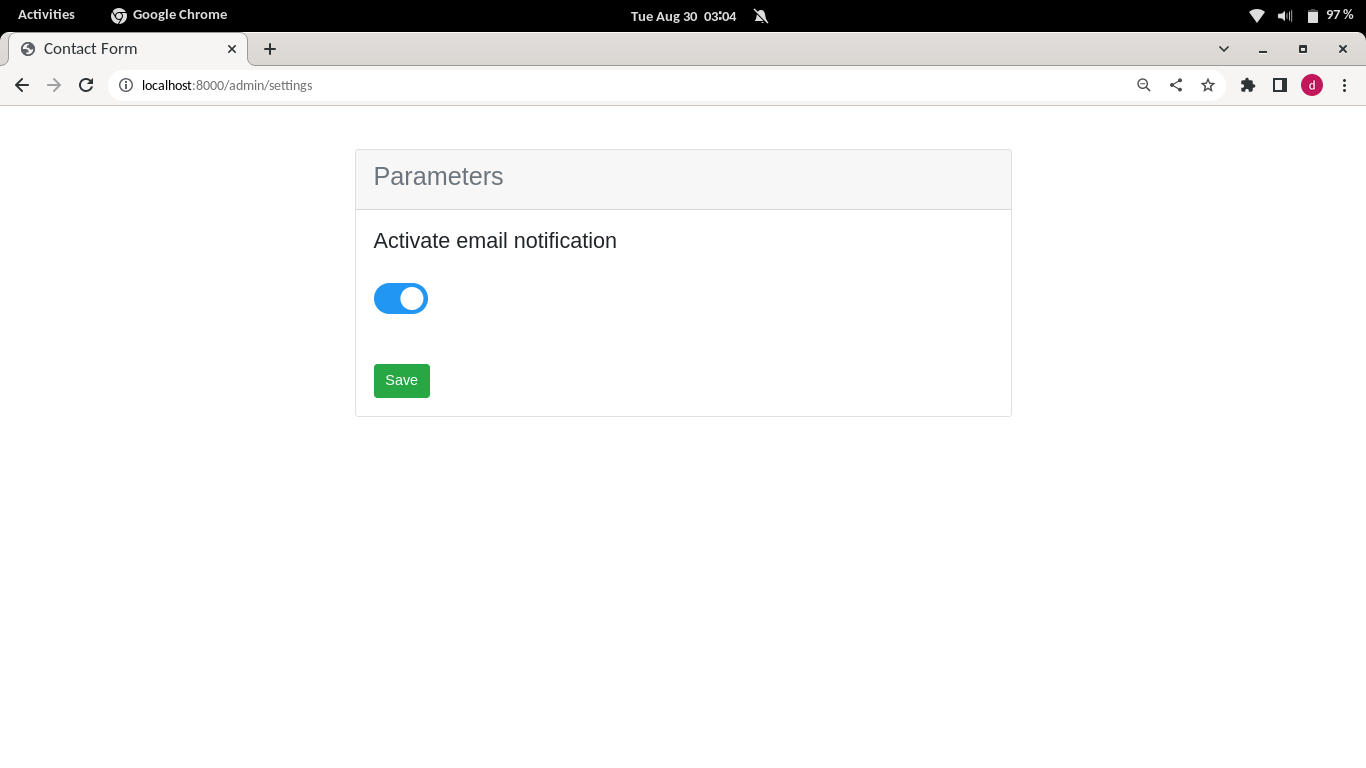
Create the file parameters.blade.php inside the folder resources/views folder and paste the following code:
The result looked like in the following picture:
5. Add email setting verification in ContactController.
The last thing to do here is the check email notification status in the ContactController to determine if we’ll send an email or not. Modify the store method in ContactController like this:
 $parameters = Parameters::where('id', 1)->first();
  if ($parameters->is_email_notification_actived) {
       Mail::to(env("ADMIN_EMAIL"))->send(new ContactMail($contact));
  }
Don’t forget to import the Parameters model with the code:
use App\Models\Parameters;Voila. We’ve added the option to enable/disable email notifications through your admin interface.
If development isn’t your field, consider hiring Laravel specialists who can supercharge your application’s scalability and performance with precision.
Wrap up
In this tutorial, we’ve added the Email notification feature to our contact form to notify the administrators after saving the message in the database. We’ll also give the possibility to the admin to enable/disable email notifications through the admin interface. You can find the complete code for this tutorial here. If you have any questions, leave a comment.

Hi, I’m Derick. I am a Software Engineer and DevOps pro. I specialize in turning complex business needs into automated workflows using Python, Odoo, and Go. I write engineering case studies here—sharing the architectural decisions and real-world code behind the solutions I build.