A blog can be considered an online journal where someone can write his thought. Nowadays, blogs are more usual and there are many free and commercial blogging systems out there with the purpose to put a blog system online without writing a single line of code. Among them, we can list WordPress, Blogger, Medium, etc.
When developers build their applications, they sometimes need to integrate an internal blogging system to cover their needs. In this tutorial series, we’ll see how you can build a blogging system using the Laravel Framework. The UML diagram for the system we’ll build during this tutorial series is the following:
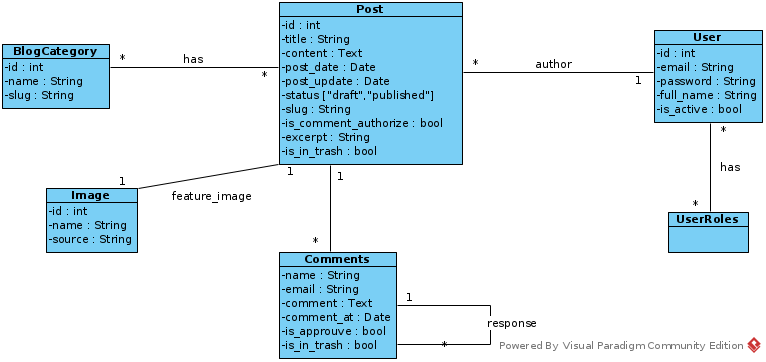
We are not going to implement all the features to get to the level of WordPress. We’ll implement the essential features and let you implement the remaining feature. The official repository for this tutorial series is https://github.com/tderick/blog-with-laravel with all the updated source code. You can make a pull request there if you implement one feature that doesn’t be implemented yet.
During this series, we’ll use two bootstrap templates: one admin template and one public view template. The admin template is CoreUI Bootstrap you can download it here. The other one is Megakit and you can download it here.
In this tutorial, we’ll create all the Laravel migrations corresponding to our UML diagrams with the corresponding models.
Before starting, let’s create a brand new Laravel project with the command :
composer create-project laravel/laravel blogPost
php artisan make:model Post -m -cThis command will create the model Post, the controller PostController and the migrations *create_posts_table.php. If you are new to Laravel, I advise you to follow my tutorial series where I explain the basic concepts of Laravel.
Open the migration file and paste in the following content:
The interesting line of code in this migration file is the following which has the responsibility to link every created post to the user who create it. In the database term, it is a foreign key.
$table->foreignId('user_id')->constrained('users')->cascadeOnUpdate()->cascadeOnDelete();Comments
php artisan make:model Comment -m -cPaste the following content in the migration file:
Image
php artisan make:model Image -m -cBlogCategory
php artisan make:model BlogCategory -m -cAssociation between Post and Category
As the association between post and category is many to many relationships, we should create a migration for the intermediate table without the model and controller.
php artisan make:migration create_blog_category__posts_tableIn this tutorial, we have focused on the creation of Laravel migrations for our blog application. To learn more about Laravel database migration, read the official documentation.
If development isn’t your field, consider hiring Laravel specialists who can supercharge your application’s scalability and performance with precision.
Hi, I’m Derick. I am a Software Engineer and DevOps pro. I specialize in turning complex business needs into automated workflows using Python, Odoo, and Go. I write engineering case studies here—sharing the architectural decisions and real-world code behind the solutions I build.
Good Job!thanks for sharing.