In this tutorial, we are going to build a simple admin panel to manage all the messages sent via our contact forms. If you haven’t read the tutorial where we have built a contact form with Laravel, I personally invite you to read that first to have the starting code for this tutorial. Alternatively, you can download the code we have produced there and you will be ready for this tutorial.
As a quick refresh, we have built a simple contact form in the previous tutorial to allow users to get in touch with us through it, and the messages they send was recorded in our database. The aim here is to put in place an admin interface where the admin user can view all the messages sent, views the details of a particular one, and finally delete a message if he wants.
This blog post is a part of a series that introduces you to the Laravel world by building a simple contact form protected by Google ReCaptcha and an admin panel to manage messages sent through our contact form.
- Part 1: Your Amazing Initiation to Laravel Framework
- Part 2: How to build a contact form with Laravel Framework
- Part 3: A simple admin panel for a Laravel contact form (This tutorial)
- Part 4: How to build an authentication system with Laravel
- Part 5: How To Easily Delete Multiple Records In Laravel Using Checkbox
- Part 6: How To Add A Beautiful Delete Confirmation Message In Laravel
- Part 7: How to protect your Laravel forms with Google reCAPTCHA V3
Caution: This article won’t cover the login and logout mechanism. The next tutorial after this will be dedicated to protecting our admin panel with an authentication.
The controller file
In the controller file, we have added three new functions.
    public function listMessages()
    {
        $messages = Contact::all();
        return view('list-messages', compact('messages'));
    }
The first function with named listmessages is responsible to retrieve all the messages stored in our database and send to the views file with the name list-messages.blade.php. The compact function is used to transform an object into an array with the same attribute as keys.
 public function message_details($id)
 {
        $message = Contact::findOrFail($id);
        return view('details-message', compact('message'));
  }
The message_details function is responsible to display the details on one message. It’s why it takes the id of the message in the argument. The first line in that function searches the message in the database with a given id. If it finds it, it stores the result in the variable $message. If not, it redirects us to a 404 Not found page. After that, the message is sent to the view details-message.blade.php to be displayed.
 public function delete_message($id)
 {
        $message = Contact::find($id);

        if ($message) {
            $message->delete();
        }
        return redirect('/admin/view-messages');
  }
The delete method is responsible to delete a particular message with his given id. The first line in that function is to find the message we want to delete. If found, we delete the message and redirect the user to the page where we list all the messages.
The complete code for this file is the following:
The web.php file
After writing those three functions in the controller file, we must create one route for each of them.
The route “/admin/view-message” is only available using the GET method to list all the messages present in our database. All the requests sent here are handled by the function listMessages.
The route “/admin/messages/{id}” allows us to get a particular message from the database. The request sent here is handled by the message_details function.
The route “/admin/message/{id}/delete” is to delete a message with a particular id. It only accepts the DELETE HTTP method.
The views files
The list-messages.blade.php
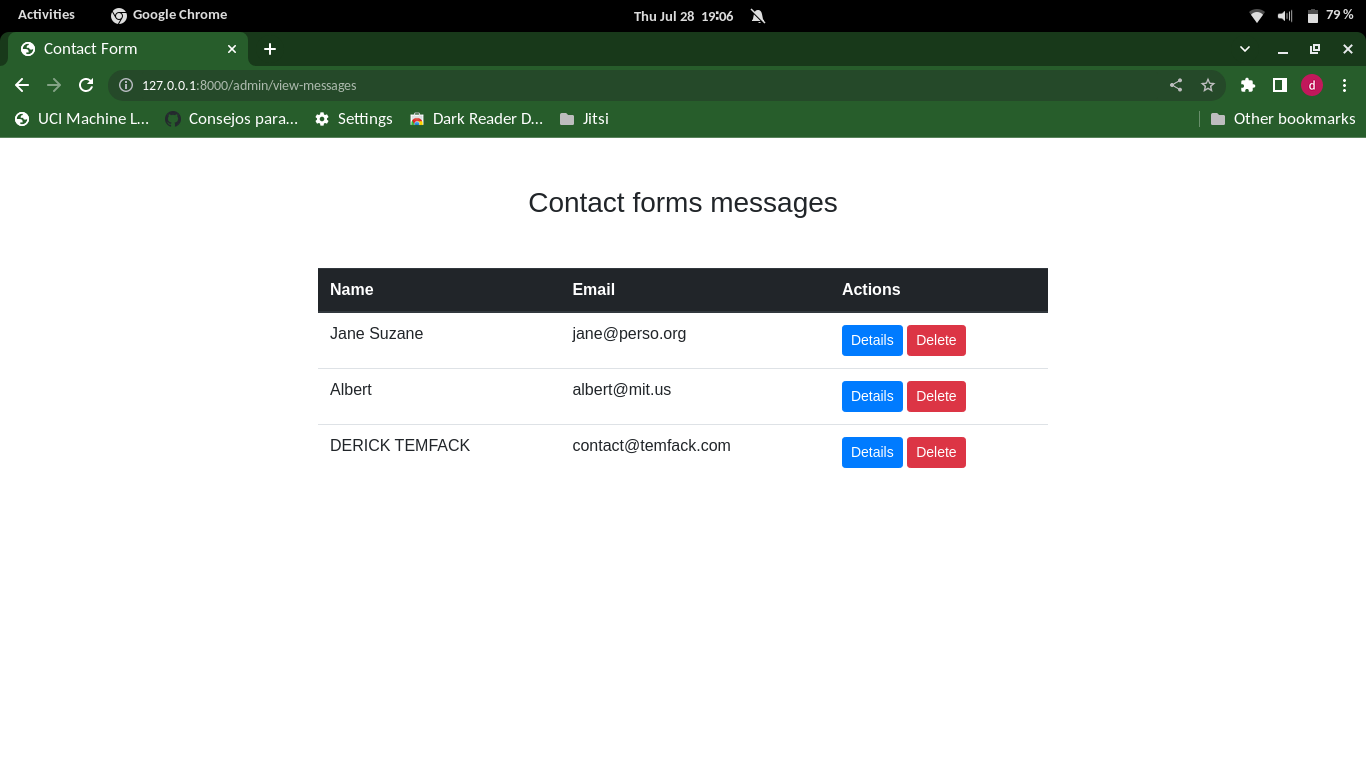
This file is used to display the list of messages we have queried from our database as shown in the image below.
We create a loop on the list of messages with the following code:
     @foreach ($messages as $message)
     ...
     @endforeach
we have added two buttons in the action part: one for the details and the other for the deletion of the message.
The details button is written like this:
<a href="{{ url('/admin/messages/' . $message->id) }}" class="btn btn-primary btn-sm">Details</a>In the href attribute, we have specified the route we have to create in the route controller to view the details on one message.
The delete button is more complicated. It can’t be a link tag because links only make a GET request. Then we use a form with only the submit button. The action attribute takes the route we have to create to delete a message.
The standard HTML form can only send a GET or a POST request. So we have added {{ method_field(‘DELETE’) }} to tell laravel that we are making a DELETE Request.
Now, start with the server with the command php artisan serve and navigate to http://127.0.0.0.1:8000/admin/view-messages
The details-message.blade.php file
This file is quite simple. The complete code is the following;
Conclusion
This was a quick one where we explained to you how you can build a simple admin panel for your contact form. Hope you enjoyed it.
If development isn’t your field, consider hiring Laravel specialists who can supercharge your application’s scalability and performance with precision.

Hi, I’m Derick. I am a Software Engineer and DevOps pro. I specialize in turning complex business needs into automated workflows using Python, Odoo, and Go. I write engineering case studies here—sharing the architectural decisions and real-world code behind the solutions I build.
7 thoughts on “A simple admin panel for a Laravel contact form”